• TrueBusiness e-Service
True_E-Service_[Mobile]-dtac-Business-Homepage-Hero-Banner-750x540-EN True_E-Service_[Desktop]-TrueBusiness-Homepage-Hero-Banner-1920x550-EN

Smarter Business in One Click

Easily manage accounts, track usage, download reports, handle billing, and make secure online payments all in one place. TrueBusiness e-Service streamlines operations, reduces paperwork, and ensures security at every step, a complete One-Stop Self-Service solution for all business needs.
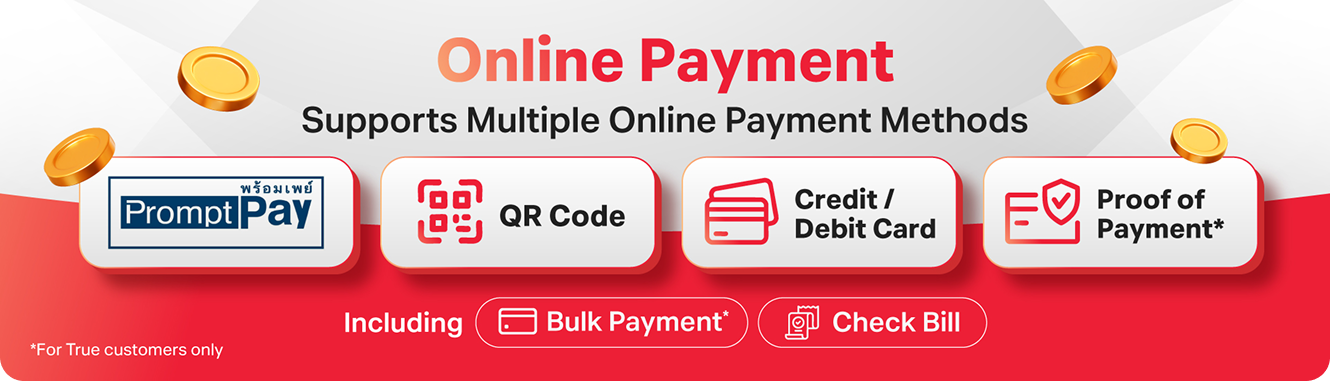
online payment
Bill Management
Bill Management
Manage bills and receipts electronically. No more delays from postal mail. Access, review, and download anytime.
  • Download bill statement
  • Download receipt
  • Enroll in e-Bill
  • Enroll in e-Tax
  • Appoint True as your withholding tax agent
  • Edit billing/tax invoice address
report
Report
Easily check and download your usage reports anytime.
  • Service overview
  • Billing report
  • Usage summary
Service Management
Service Management
All in one place to manage your business services and packages easily.
  • Check your current packages
  • Purchase add-on packages (for single or multiple numbers)
  • Suspend / Restore Service
One click for all your business needs
Manage bills, services, and reports easily in a fully digital experience anytime, anywhere

Click to watch the video
Video cover
 

Choose the online management solution that best fits your business—

all in one place. 

More convenience in one click, anytime and anywhere
Perfect for businesses that value flexibility and self-management.
  • Check your usage and billing details before payment
  • Pay bills online and instantly download receipts and tax invoices in real time
  • View and manage multiple accounts on a single screen
  • Upload withholding tax (WHT) forms in one step
  • Reduce paperwork and minimize accounting errors for faster and more accurate operations

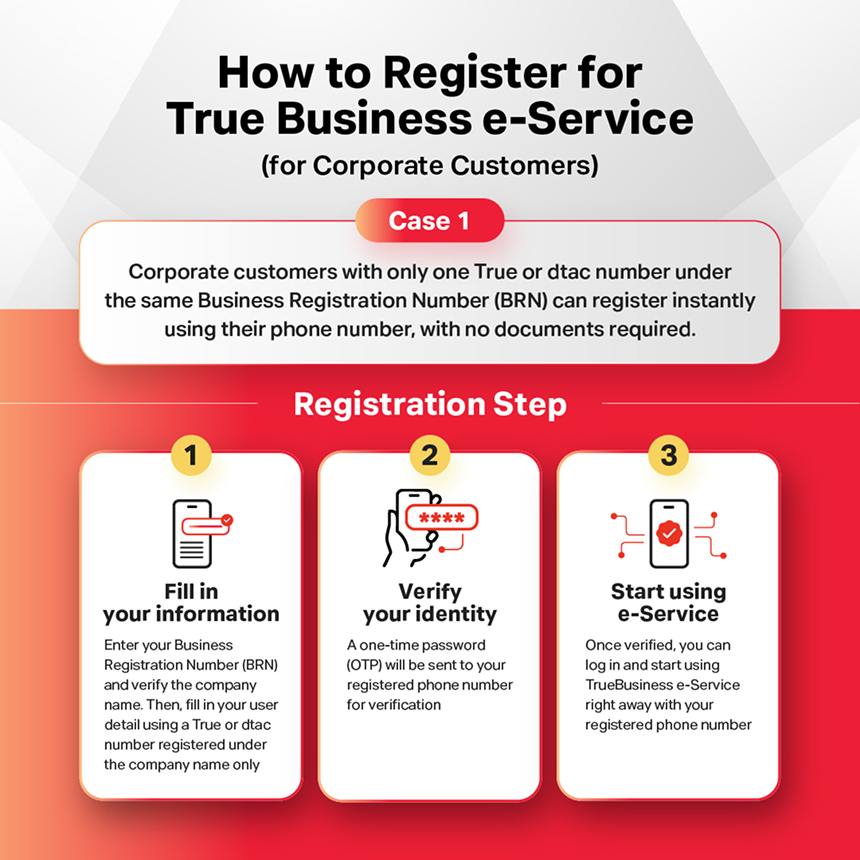
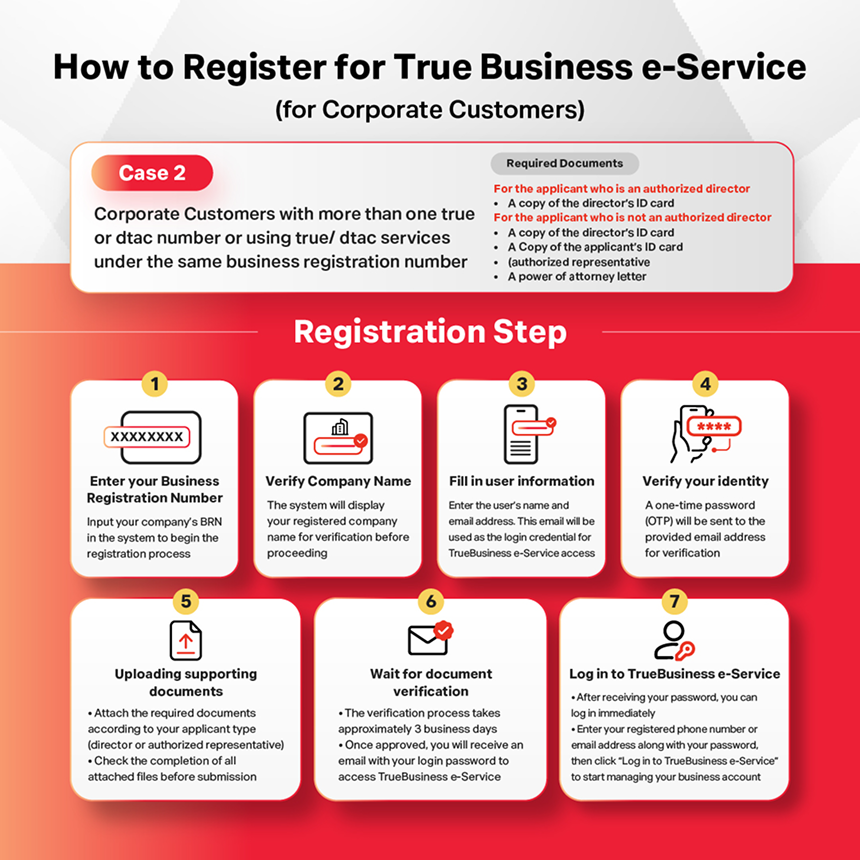
How to Register for e-Service (for Corporate Customers)

Case 1: Corporate customers who have only one True or dtac number under the same business registration number.
How to Register for e-Service (for Corporate Customers)
Case 2: Corporate Customers with More Than One True or dtac Number or Using Other True/dtac Services Under the Same Business Registration Number
How to Register for e-Service (for Corporate Customers)

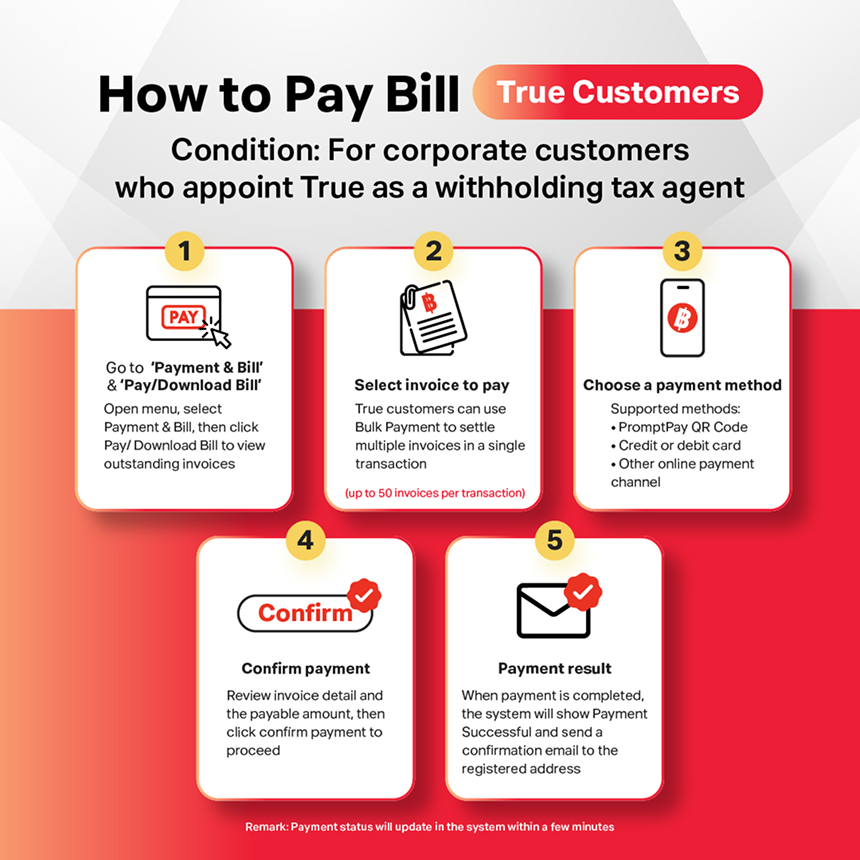
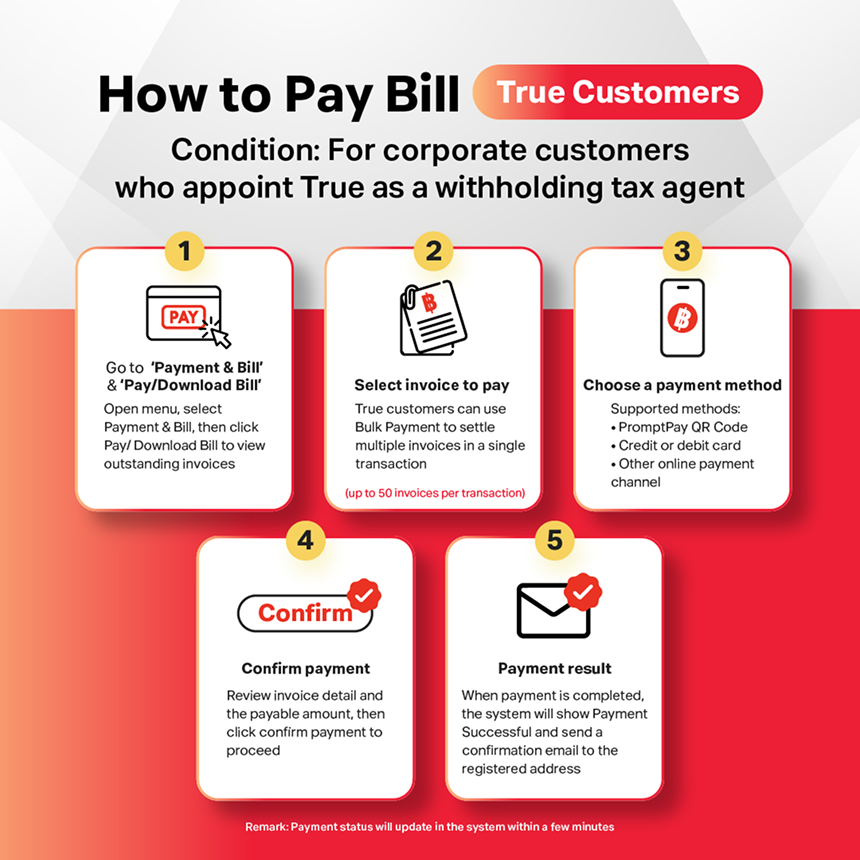
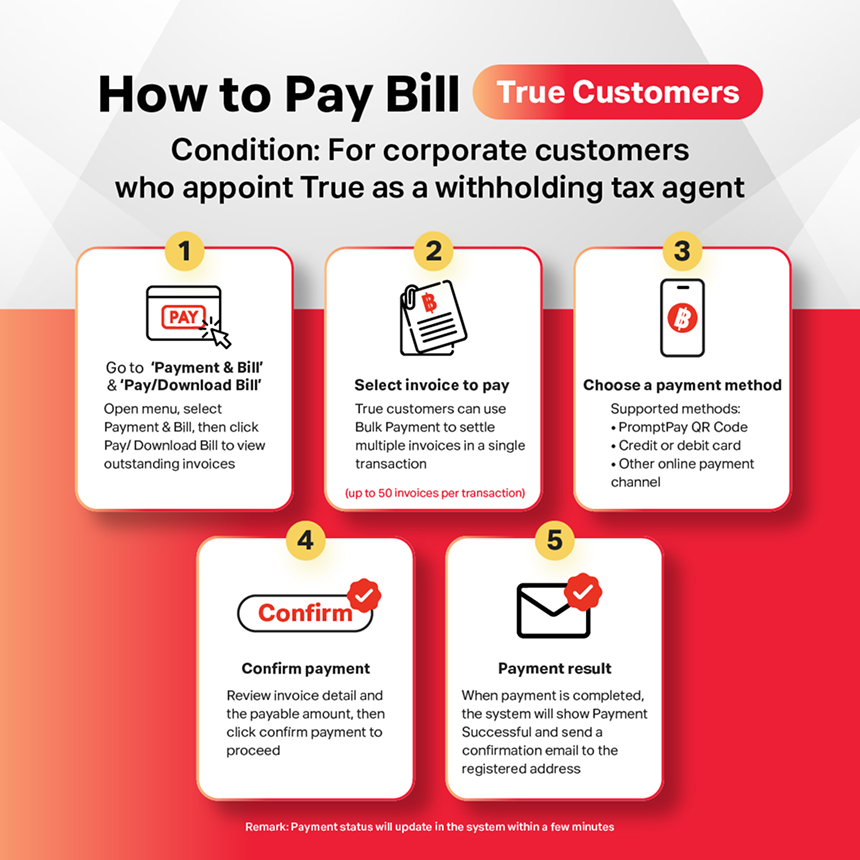
How to Pay Bills — True Customers

Scenario: True is appointed as your WHT withholding agent
How to Pay Bills — True Customers
Notes
  • dtac customers can pay per account only and cannot select all.
  • Payment status will update in the system within a few minutes.
How to Pay Bills — Self Withholding Tax (Customer submits WHT)

How to Pay Bills — dtac Customers
How to Pay Bills — dtac Customers
Additional notes
  • You can review your history in Payment History/Receipts.
  • If you encounter any issues, please contact the TrueBusiness Contact Center.

How to Upload Proof of Payment
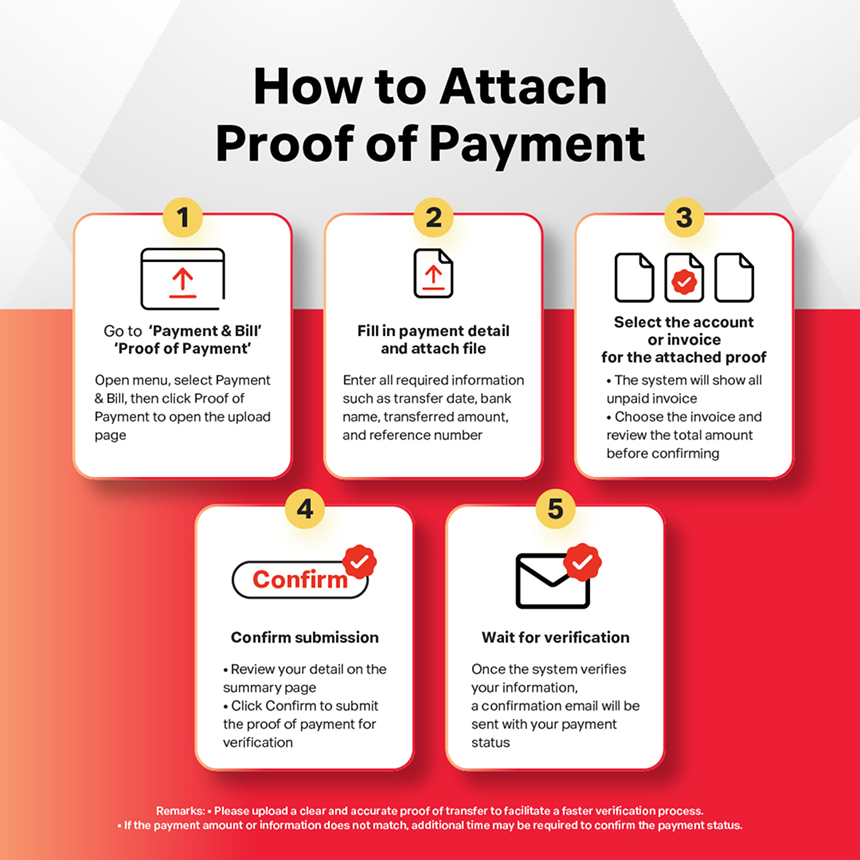
How to Upload Proof of Payment

How to Appoint True as Your Withholding Tax (WHT) Submission Agent
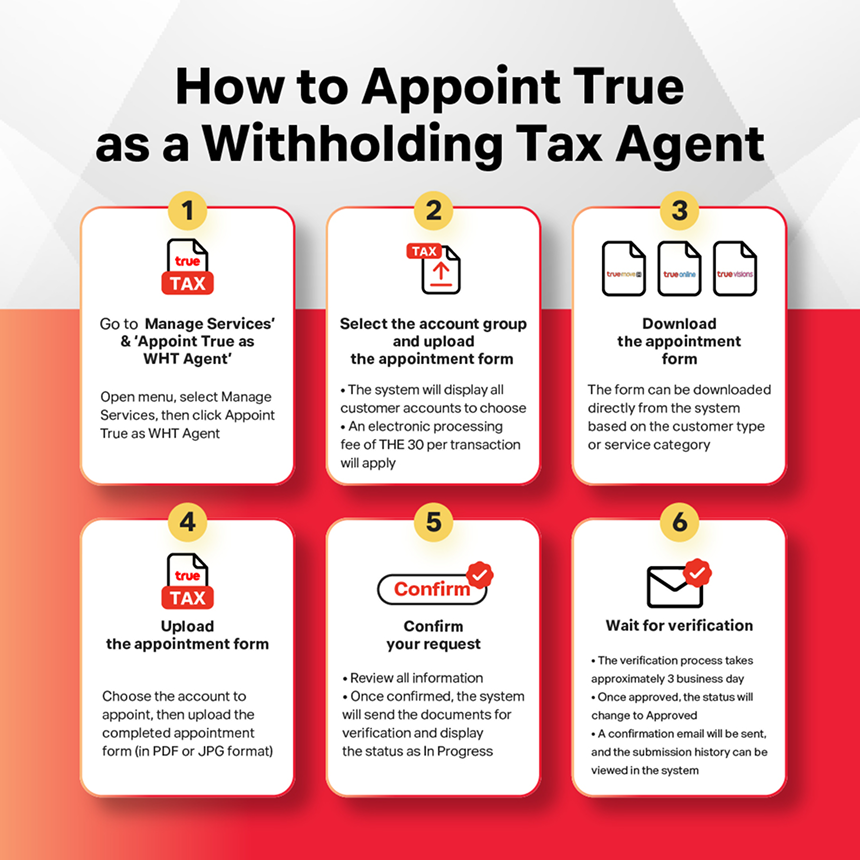
How to Appoint True as Your Withholding Tax (WHT) Submission Agent

How to Download Your Invoice
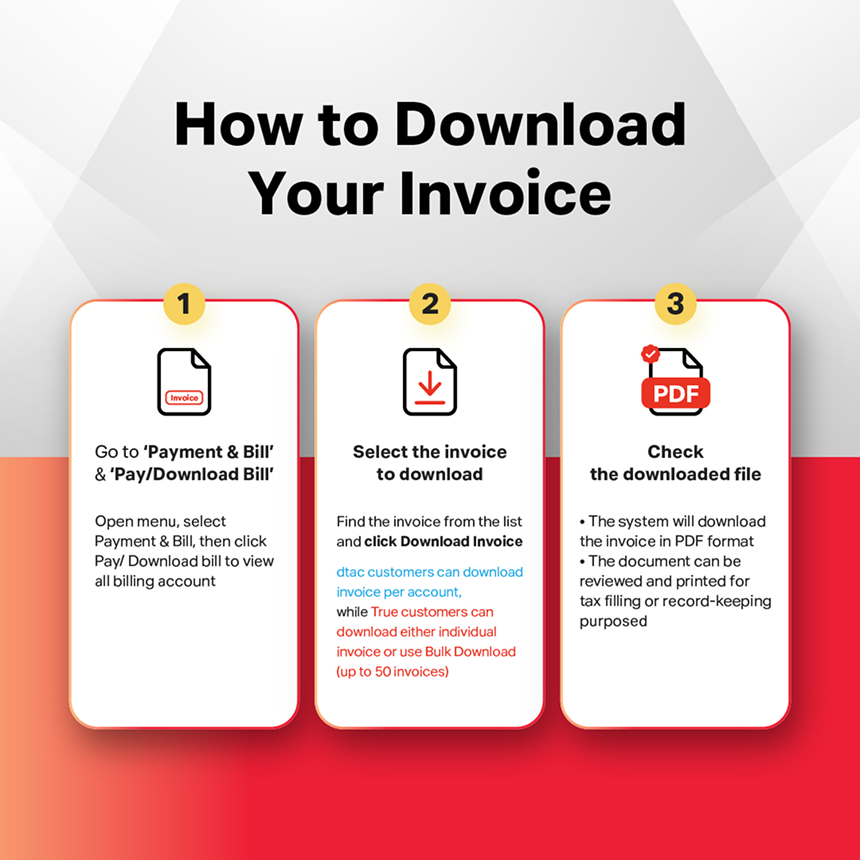
How to Download Your Invoice

How to Download Your Receipt
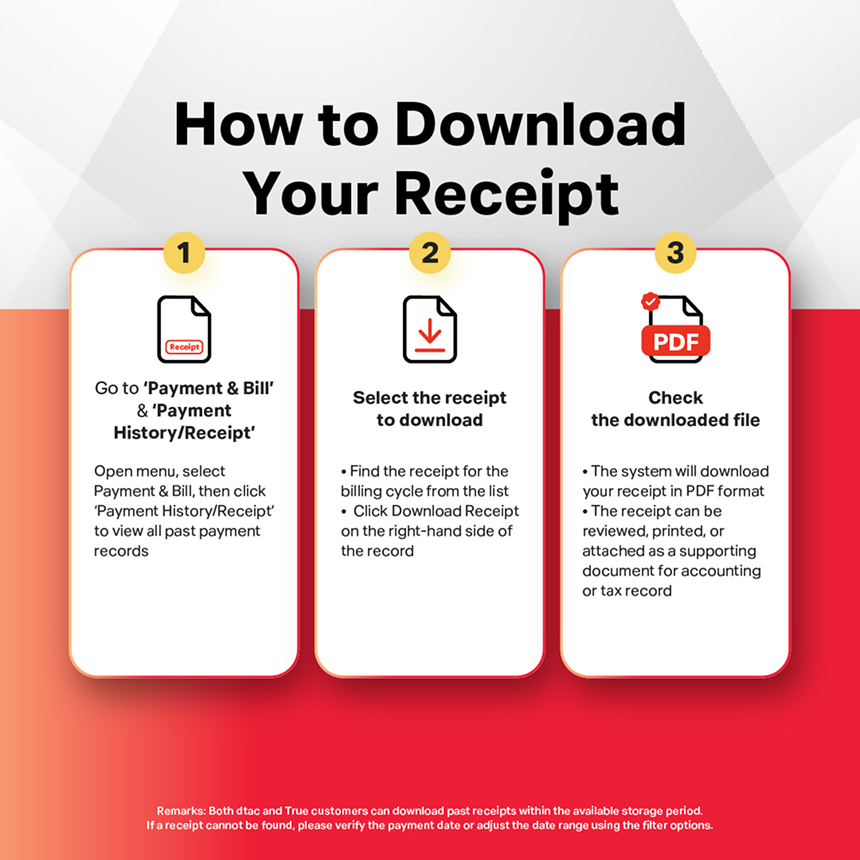
How to Download Your Receipt

How to Switch to Email Billing and Receipts
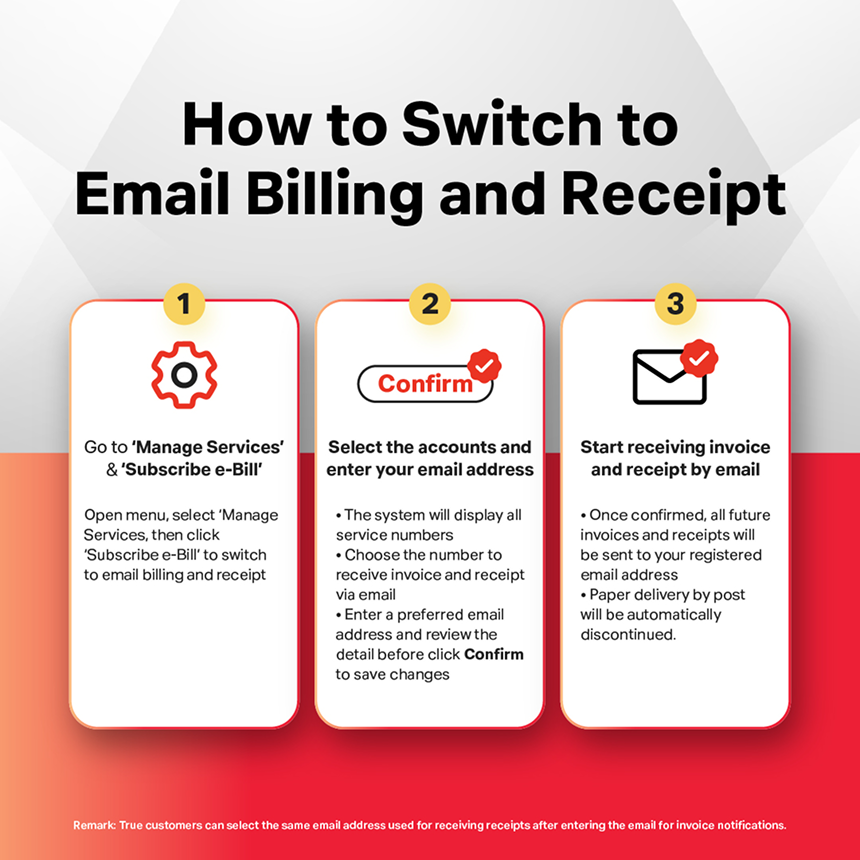
How to Switch to Email Billing and Receipts

User Manual

Download User Manual
FOR MORE INFORMATION
Let’s Connect
contact mail
Call Center
1239
icon arrow right
contact live chat
Contact Us for Details
icon arrow right
SUBMIT INQUIRY

ทดสอบแยก Column ใน hubspot เป็น 2 Col

Receive bills, pay easily and conveniently, and receive receipts immediately, no worries.

Just register for the service, apply for an e-bill, e-tax and Pay via TrueBusiness iService

Service payment channels

TrueBusiness iService

Corporate to Corporate

ช่องทางชำระ/ผู้ให้บริการ
บริการออนไลน์ สำหรับลูกค้าทรูบิสิเนส
ประเภทการชำระ
  • บัตรเครดิต
  • บัญชีธนาคาร
  • ทดสอบถ้ารูปใหญ่ จะสูงสุด 24px
ขั้นตอนการหักผ่านบัญชีธนาคาร
เลือกเมนู “บิล & จ่าย” และช่องทางการชำระเงิน
1
ชำระด้วย PromptPay QR Code
  1. เลือกบิลที่ต้องการชำระ โดยสามารถเลือกชำระได้สูงสุด 50 บิล ไม่เกิน 150,000 บาท
  2. เลือกข้อมูลตามผลิตภัณฑ์ หรือ ค้นหาข้อมูลตามชื่อสาขา/เลขที่สาขา หรือ ตามชื่อบัญชี / เลขบัญชี
  3. กดปุ่มสร้าง PromptPay QR Code >> สแกน QR เพื่อชำระค่าบริการ
  4. กรณีชำระเงินสำเร็จ หน้าจอจะแสดงผลการชำระเงิน และสามารถตรวจสอบประวัติการชำระได้
2
ชำระด้วย บัตรเครดิต / เดบิต
  1. เลือกบิลที่ต้องการชำระ โดยสามารถเลือกชำระได้สูงสุด 50 บิล ไม่เกิน 25,000 บาท รับชำระด้วย VISA, Master Card และ JCB
  2. เลือกข้อมูลตามผลิตภัณฑ์ หรือ ค้นหาข้อมูลตามชื่อสาขา/เลขที่สาขา หรือ ตามชื่อบัญชี/เลขบัญชี
  3. ระบุข้อมูลบัตรหรือบันทึกข้อมูลบัตรไว้ใช้ครั้งถัดไป
  4. กรณีชำระเงินสำเร็จ หน้าจอจะแสดงผลการชำระเงิน และสามารถตรวจสอบประวัติการชำระได้
ใบกำกับภาษี (ฉบับจริง)
  • e-Tax invoice ผ่านทาง SMS หรือ Email ทันที
  • ไปรษณีย์ ตามที่อยู่ระบุในใบกำกับภาษี ภายใน 5 วัน

Direct debit *

Free of charge

Lorem ipsum dolor sit amet consectetur adipisicing elit. Eos laudantium quidem quae non doloribus architecto repellendus iure minus illum officiis vel voluptas, distinctio ducimus quam dolores? Nemo voluptatibus ullam deleniti.

Direct credit card *

Free of charge

Lorem ipsum dolor sit amet consectetur adipisicing elit. Eos laudantium quidem quae non doloribus architecto repellendus iure minus illum officiis vel voluptas, distinctio ducimus quam dolores? Nemo voluptatibus ullam deleniti.

Banking *

ค่าธรรมเนียม ตามอัตราที่ธนาคารกำหนด

Lorem ipsum dolor sit amet consectetur adipisicing elit. Eos laudantium quidem quae non doloribus architecto repellendus iure minus illum officiis vel voluptas, distinctio ducimus quam dolores? Nemo voluptatibus ullam deleniti.

Counter Service *

ค่าธรรมเนียม 15 บาท

Lorem ipsum dolor sit amet consectetur adipisicing elit. Eos laudantium quidem quae non doloribus architecto repellendus iure minus illum officiis vel voluptas, distinctio ducimus quam dolores? Nemo voluptatibus ullam deleniti.

True Shop / True Center

Free of charge

Lorem ipsum dolor sit amet consectetur adipisicing elit. Eos laudantium quidem quae non doloribus architecto repellendus iure minus illum officiis vel voluptas, distinctio ducimus quam dolores? Nemo voluptatibus ullam deleniti.

ตัวแทนรับชำระ *

ค่าธรรมเนียม ตามอัตราที่ตัวแทนกำหนด

Lorem ipsum dolor sit amet consectetur adipisicing elit. Eos laudantium quidem quae non doloribus architecto repellendus iure minus illum officiis vel voluptas, distinctio ducimus quam dolores? Nemo voluptatibus ullam deleniti.
dtac My Business online service for dtac business customers

Pay for services via the online channel My Business, pay via credit / debit card, convenient, fast, and safe.

Just register for the service, apply for an e-bill, e-tax and Pay via TrueBusiness iService

Service payment channels

ศูนย์บริการดีแทค

Corporate to Corporate

ช่องทางชำระ/ผู้ให้บริการ
บริการออนไลน์ สำหรับลูกค้าทรูบิสิเนส
ประเภทการชำระ
  • บัตรเครดิต
  • บัญชีธนาคาร
  • ทดสอบถ้ารูปใหญ่ จะสูงสุด 24px
ขั้นตอนการหักผ่านบัญชีธนาคาร
เลือกเมนู “บิล & จ่าย” และช่องทางการชำระเงิน
1
ชำระด้วย PromptPay QR Code
  1. เลือกบิลที่ต้องการชำระ โดยสามารถเลือกชำระได้สูงสุด 50 บิล ไม่เกิน 150,000 บาท
  2. เลือกข้อมูลตามผลิตภัณฑ์ หรือ ค้นหาข้อมูลตามชื่อสาขา/เลขที่สาขา หรือ ตามชื่อบัญชี / เลขบัญชี
  3. กดปุ่มสร้าง PromptPay QR Code >> สแกน QR เพื่อชำระค่าบริการ
  4. กรณีชำระเงินสำเร็จ หน้าจอจะแสดงผลการชำระเงิน และสามารถตรวจสอบประวัติการชำระได้
2
ชำระด้วย บัตรเครดิต / เดบิต
  1. เลือกบิลที่ต้องการชำระ โดยสามารถเลือกชำระได้สูงสุด 50 บิล ไม่เกิน 25,000 บาท รับชำระด้วย VISA, Master Card และ JCB
  2. เลือกข้อมูลตามผลิตภัณฑ์ หรือ ค้นหาข้อมูลตามชื่อสาขา/เลขที่สาขา หรือ ตามชื่อบัญชี/เลขบัญชี
  3. ระบุข้อมูลบัตรหรือบันทึกข้อมูลบัตรไว้ใช้ครั้งถัดไป
  4. กรณีชำระเงินสำเร็จ หน้าจอจะแสดงผลการชำระเงิน และสามารถตรวจสอบประวัติการชำระได้
ใบกำกับภาษี (ฉบับจริง)
  • e-Tax invoice ผ่านทาง SMS หรือ Email ทันที
  • ไปรษณีย์ ตามที่อยู่ระบุในใบกำกับภาษี ภายใน 5 วัน

dtac Business E-Care

Free of charge

Lorem ipsum dolor sit amet consectetur adipisicing elit. Eos laudantium quidem quae non doloribus architecto repellendus iure minus illum officiis vel voluptas, distinctio ducimus quam dolores? Nemo voluptatibus ullam deleniti.

ผ่านธนาคาร

Free of charge

Lorem ipsum dolor sit amet consectetur adipisicing elit. Eos laudantium quidem quae non doloribus architecto repellendus iure minus illum officiis vel voluptas, distinctio ducimus quam dolores? Nemo voluptatibus ullam deleniti.

ตัวแทนรับชำระเงิน หรือ เคาน์เตอร์รับชำระ ที่มีเครื่องหมายเคาน์เตอร์เซอร์วิส และ Cenpay อาทิ

Free of charge

Lorem ipsum dolor sit amet consectetur adipisicing elit. Eos laudantium quidem quae non doloribus architecto repellendus iure minus illum officiis vel voluptas, distinctio ducimus quam dolores? Nemo voluptatibus ullam deleniti.
* Business customers can use True to deduct and submit withholding taxes.

Google Workspace

วิธีการตั้งค่าการใช้บริการ
1
ขั้นตอนเข้าใช้งาน Google Admin Console
ท่านต้องซื้อและมอบสิทธิ์การใช้งาน Google Workspace แก่ผู้ใช้แต่ละคนในองค์กร เพื่อให้ผู้คนในองค์กรใช้บริการ Google Workspace ได้ โดยการซื้อสิทธิ์การใช้งานมีขั้นตอนดังนี้
  1. ท่านจะได้รับอีเมลจาก The Google Workspace Team รายละเอียดดังนี้
    • ผู้ส่ง:The Google Workspace Team <workspace-noreply@google.com>
    • ชื่อหัวข้ออีเมล: [Action Required] You’ve signed up for a Google product: What’s next?
  2. ดำเนินการตามขั้นตอนในอีเมล เพื่อกำหนดรหัสผ่านบัญชี Google Workspace ของท่าน ในการเข้าสู่ Google Admin console
  3. เข้าสู่ Google Admin console ยอมรับ Google Product Agreement เพื่อให้สามารถเริ่มต้นการใช้งาน Google Workspace ได้
2
ขั้นตอนการยืนยันการเป็นเจ้าของโดเมน
ท่านจำเป็นต้องดำเนินการยืนยันการเป็นเจ้าของโดเมน หรือที่อยู่เว็บธุรกิจของท่านก่อนเริ่มใช้บริการ Google Workspace การดำเนินการนี้ช่วยตรวจสอบไม่ให้บุคคลอื่นใช้โดเมนของท่านโดยไม่ได้รับอนุญาต (เช่น ใช้โดเมนเพื่อส่งอีเมล) การยืนยันโดมนสามารถดำเนินการได้หลายรูปแบบ ขึ้นอยู่กับผู้รับจดทะเบียนโดเมนของท่าน โดยท่านสามารถดำเนินการยืนยันโดเมนได้ ที่นี่
3
ศูนย์การเรียนรู้ Google Workspace
ศูนย์การเรียนรู้ Google Workspace รวมข้อมูลทั้งหมดที่ท่านควรทราบ เพื่อช่วยให้ท่านเริ่มต้นการใช้งาน Google Workspace ได้อย่างมีประสิทธิภาพอย่างสูงสุด ทั้งในส่วนของการตั้งค่าต่างๆ ข้อมูลผลิตภัณฑ์และส่วนเสริมต่างๆ ของ Google Workspace
4
ขั้นตอนการเพิ่มบัญชีสำหรับผู้ใช้ใหม่
ก่อนเพิ่มบัญชีผู้ใช้ใหม่ให้กับพนักงานของท่าน ท่านต้องซื้อสิทธิ์การใช้งาน Google Workspace* ให้ผู้ใช้แต่ละคนเพื่อให้ผู้คนในองค์กรใช้บริการ Google Workspace ได้ เมื่อการสั่งซื้อสิทธิ์การใช้งาน Google Workspace ของท่านเสร็จสมบูรณ์แล้ว ท่านสามารถดำเนินการเพิ่มบัญชีสำหรับผู้ใช้ใหม่ได้ตามขั้นตอนดังนี้
  1. ลงชื่อเข้าใช้ Google Admin console ต้องลงชื่อเข้าใช้ด้วยบัญชีผู้ดูแลระบบ เช่น admin@mycompany.com
  2. จากคอนโซลผู้ดูแลระบบ ให้ไปที่ 'เมนู' จากนั้น 'ไดเรกทอรี' จากนั้น 'ผู้ใช้'
  3. คลิกเชิญผู้ใช้ใหม่/เพิ่มผู้ใช้ใหม่ด้านบนของหน้า
  4. กรอกแบบฟอร์มเพื่อเชิญผู้ใช้ให้เข้าร่วมทีม หรือเพิ่มรายละเอียดบัญชี
  5. หากต้องการเพิ่มผู้ใช้อีก ให้ทำขั้นตอนทั้งหมดซ้ำอีกครั้ง
*ศึกษาขั้นตอนการซื้อสิทธิ์การใช้งาน Google Workspace จาก SME now ได้ที่หัวข้อ 'ขั้นตอนการซื้อสิทธิ์การใช้งาน Google Workspace'
5
ขั้นตอนการลบบัญชี
หากผู้ใช้ไม่จำเป็นต้องใช้บัญชีผู้ใช้อีกต่อไป ในฐานะผู้ดูแลระบบจะลบหรือนำบัญชีออกได้ โดยขึ้นอยู่กับประเภทบริการของ Google ที่ใช้ และจะโอนข้อมูลของผู้ใช้ให้กับผู้ใช้คนอื่นได้ เช่น ผู้ดูแลระบบหรือผู้จัดการ ท่านสามารถดำเนินการลบบัญชีได้ตามขั้นตอนดังนี้
  1. ลงชื่อเข้าใช้ Google Admin console ต้องลงชื่อเข้าใช้ด้วยบัญชีผู้ดูแลระบบ เช่น admin@mycompany.com
  2. จากคอนโซลผู้ดูแลระบบ ให้ไปที่ 'เมนู' จากนั้น 'ไดเรกทอรี' จากนั้น 'ผู้ใช้'
  3. เลื่อนเมาส์ไปยังผู้ใช้ที่คุณต้องการนำออกในรายชื่อผู้ใช้ แล้วคลิกนำผู้ใช้ออกหรือเพิ่มเติมจากนั้นลบผู้ใช้ หมายเหตุ: คุณอาจต้องเลือกช่องเพื่อยืนยันว่าคุณเข้าใจผลของการลบบัญชี ทั้งนี้ขึ้นอยู่กับสิทธิ์ของผู้ดูแลระบบที่มีและบริการของ Google ที่ใช้งาน
กรุณาทำความเข้าใจผลกระทบจากการที่ท่านลบหรือนำผู้ใช้ออกได้ ที่นี่

Microsoft 365

คู่มือการใช้งาน
1
ขั้นตอนการซื้อสิทธิ์การใช้งาน Microsoft 365 สำหรับธุรกิจ
ท่านต้องซื้อและมอบสิทธิ์การใช้งาน Microsoft 365 สำหรับธุรกิจแก่ผู้ใช้แต่ละคนในองค์กร เพื่อให้ผู้คนในองค์กรใช้บริการ Microsoft 365 สำหรับธุรกิจได้ โดยการซื้อสิทธิ์การใช้งานมีขั้นตอนดังนี้
  1. ลงชื่อเข้าใช้บัญชีของท่านที่ SME now
  2. เลือก 'Marketplace'
  3. เลือกบริการ Microsoft 365 สำหรับธุรกิจ ที่ต้องการซื้อสิทธิ์การใช้งานเพิ่ม
  4. ในขั้นตอนตั้งค่าการซื้อ เลือก 'ใช้บัญชี Microsoft CSP ที่มีอยู่'
  5. ระบุชื่อโดเมน Microsoft ของท่านที่ท่านต้องการซื้อสิทธิ์การใช้งาน Microsoft 365 สำหรับธุรกิจเพิ่ม
  6. เลือก 'ถัดไป'
  7. ตรวจสอบรายการสั่งซื้อพร้อมเลือกยอมรับเงื่อนไขการซื้อสินค้าและข้อกำหนดและเงื่อนไขบริการ Microsoft 365
  8. เลือก 'ซื้อ'
หลังจากการยืนยันคำสั่งซื้อ ระบบจะใช้เวลาตรวจสอบรายการสั่งซื้อ
เมื่อรายการสั่งซื้อเสร็จสมบูรณ์แล้ว ท่านจึงจะสามารถดำเนินการเพิ่มบัญชีสำหรับผู้ใช้ใหม่ในองค์กรได้
2
ขั้นตอนการไม่ต่ออายุ Microsoft 365 สำหรับธุรกิจ
หากท่านไม่ต้องการต่ออายุการใช้งานบริการ Microsoft 365 สำหรับธุรกิจกับ SME now ในปีถัดไป ท่านจำเป็นต้องแจ้งความประสงค์ในการไม่ต่ออายุให้ทาง SME now ทราบเป็นลายลักษณ์อักษรล่วงหน้าไม่น้อยกว่า 45 วัน ก่อนการสิ้นสุดระยะเวลาเริ่มต้นหรือระยะเวลาที่ต่ออายุสัญญา ในการแจ้งความประสงค์ในการไม่ต่ออายุ ท่านสามารถดำเนินการตามขั้นตอนดังนี้
  1. ส่งอีเมลแจ้งความประสงค์ไม่ต้องการต่ออายุการใช้งานบริการ Microsoft 365 สำหรับธุรกิจ มาที่ smenow@truecorp.co.th
  2. เมื่อทีมงาน SME now ตอบกลับอีเมล รับทราบในความประสงค์ของท่าน ให้ท่านดำเนินการต่อ
  3. ลงชื่อเข้าใช้บัญชีของท่านที่ SME now
  4. เลือกบริการ Microsoft 365 สำหรับธุรกิจ ที่ไม่ต้องการต่ออายุการใช้งาน จากแถบเมนูด้านซ้าย
  5. เลือก 'จัดการการสมัครสมาชิก'
  6. เลือก '...'
  7. เลือก 'ปิดใช้งานการต่ออายุโดยอัตโนมัติ' รายละเอียดการสมัครสมาชิกจะเปลี่ยนจาก ต่ออายุเมื่อ เป็น หมดอายุในวันที่
3
ขั้นตอนการยกเลิกบริการ Microsoft 365 สำหรับธุรกิจ
หากท่านต้องการให้การใช้บริการ Microsoft 365 สำหรับธุรกิจ กับ SME now สิ้นสุดลงก่อนระยะเวลาตามสัญญาที่เกี่ยวข้อง (ยกเลิกบริการก่อนครบกำหนดสัญญา) ท่านอาจต้องจ่ายค่าธรรมเนียมการยกเลิกและจะต้องรับผิดต่อบริษัทฯ ตามข้อกำหนดและเงื่อนไขบริการ Microsoft 365 ในการแจ้งความประสงค์ยกเลิกบริการ ท่านสามารถดำเนินการตามขั้นตอนดังนี้
  1. ลงชื่อเข้าใช้บัญชีของท่านที่ SME now
  2. เลือกบริการ Microsoft 365 สำหรับธุรกิจ ที่ต้องการยกเลิกบริการ จากแถบเมนูด้านซ้าย
  3. เลือก 'จัดการการสมัครสมาชิก'
  4. เลือก '...'
  5. เลือก 'ยกเลิกการสมัครสมาชิก' ท่านจะเข้ามาสู่หน้ายกเลิกการสมัครสมาชิก
  6. ตรวจสอบรายละเอียดค่าธรรมเนียมการยกเลิก และระบุเหตุผลในการยกเลิก
  7. เลือก 'ยืนยัน'
หลังจากการยืนยันยกเลิกบริการ ระบบจะใช้เวลาตรวจสอบรายการยกเลิกบริการ
  • หากบริการของท่านชำระผ่านใบแจ้งค่าบริการ - ค่าบริการสำหรับระยะเวลาสัญญา 1 ปีได้ถูกเรียบเก็บจากท่านในใบแจ้งค่าบริการทางบัญชี dtac Mybusiness เรียบร้อยแล้ว แม้การยกเลิกบริการเสร็จสมบูรณ์แล้ว ท่านยังต้องดำเนินการชำระใบแจ้งค่าบริการนั้นเต็มจำนวนเพื่อไม่ให้มียอดค้างชำระ
  • หากบริการของท่านชำระผ่านบัตรเครดิต/ เดบิต - ค่าบริการสำหรับระยะเวลาสัญญา 1 ปีได้ถูกเรียบเก็บจากท่านตั้งแต่การเริ่มต้นการใช้งานครั้งแรก จึงไม่มีค่าธรรมเนียมการยกเลิกที่ต้องชำระ